Wednesday, April 29, 2009
Tales of a Tiered Cake #2 – The Filling
To figure out how much filling I need, I have to figure out the area of each cake and then I can adapt my recipe accordingly. If you don’t know how to do this, the formula is:
Pi multiplied by the radius squared, or Πr2
The radius is half of the diameter, so if you have a 12-inch round pan, the radius is half of that, or 6. Pi = 3.14159
For my purposes, I always just round that to 3. So for my area here is my formula:
12-inch layer
6x6 (radius2) x 3 (pi) = 108
9-inch layer
4.5x4.5 x 3 = 61 (rounded)
6-inch layer
3x3 x 3 = 27
You can also use this formula if you want to make a cake that is bigger or smaller than the recipe you have.
I need to start with the filling because it takes time to marinate. I'll be using a marinated cherry filling that I've adapted from my CD-rom, Amazing Passover Desserts. For this cake I'll be adding some dried tart cherries to the original recipe and also I'll be chopping them in the processor, rather than leaving them whole. For the engagement cake, I think this will make a more uniform layer and will look nicer in the cake. The dried cherries, which I couldn't use for Passover (not kosher), add a depth of flavor that is truly wonderful, plus they have a little more tooth than the frozen cherries, as well. Oh, I should mention that I've never made this particular version before and am only guessing that it will work well in the cake. I'll have to report back after we taste it!
Sweet and Tart Cherry Filling
4 pounds frozen sweet cherries
1/2 cup Manischewitz™ Blackberry wine
2 cups sugar
1/2 cup orange juice
1/2 teaspoon cinnamon
1 cup dried tart cherries
2-4 tablespoons cornstarch
Defrost the cherries in a colander, over a bowl, and reserve the juice. Transfer the juice to a medium pot. You should have about 3 cups juice (press on the cherries to extract more of the juice). Add the wine, and simmer until the mixture is reduced by half. Add the sugar and orange juice. Stir until the sugar dissolves. Stir in the cinnamon and the dried cherries. Transfer the mixture to a storage container, and refrigerate for at least 2 days and up to 2 weeks. As the defrosted cherries marinate, they will actually get firmer and tastier, while the dried cherries will get softer and plumper.
When ready to use the cherries, place the cornstarch in a small bowl. Gradually stir in 1/4 to 1/2 cup of the cherry juice (use 2 TB cornstarch for a lightly thickened mixture and 4 tablespoons for a very thick, gelled topping or filling). Place the remaining cherries and juice in a large pot. Bring to a simmer and stir in the cornstarch mixture. The mixture will look cloudy. Cook until the mixture thickens and becomes translucent. Remove from the heat and let cool. Refrigerate until ready to use.
Monday, April 27, 2009
Tales of A Tiered Cake #1 – Getting Started

This was the first tiered cake that I made for Ballantyne Country Club's Rally for a Cure, to benefit Susan G. Komen for the Cure. It's a lot easier to make a cake with columns because then you don't have to deal with damaging one tier while placing the next. I molded the top ornament out of chocolate plastique and gumpaste and poured pink chocolate into molds to make the golf balls. I don't remember what I used for the BCC logo, but it looks pretty good, I think!
You'll see a picture of my second tiered cake, with my next post in this series
I'm starting to think about my third tiered cake, which will be for an engagement cake for the double-engagement party we're having for both our son and daughter. My son's fiancée would prefer a cake that's not chocolate, but my daughter loves chocolate, so I'm currently planning on doing one big tier in chocolate and the two smaller tiers in white- with the outside frosting being white, so that they'll all match.
This time around I'm going to attempt to place the tiers one on top of the other, and I'm not using a unique decorating theme, but am using one that I found in The Wedding Cake Book, by Dede Wilson.
As with the previous two cakes, I plan on using real buttercream – no crisco, no powdered sugars and nothing artificial. The cakes will taste very fresh, because they’ll be frozen as soon as they are made. I'll be making 12-inch, 9-inch and 6-inch tiers. Although I'll be using my own cake, frosting and filling I like Dede's instructions for assembly better than Wilton, for example, because she also uses all fresh ingredients and buttercream.
Usually I like to make a whole dessert before posting, but making a tiered cake is a huge project, so I've decided to post as I prepare and make it. You’ll get to hear about what I’ve done wrong and right. You won't know until the very end what the cake looks like. It'll be a surprise for everyone (including my daughter and son who subscribe to my blog!). In addition, because I do not make tiered cakes professionally, I’ll be having the same problems that you might have if you were to make a tiered cake in your home. I’ll be freezing the cakes to keep them fresh, but also so that I'm not a nervous wreck just before the event. Ideally, you would want to make one tier from cake through frosting, freeze it, and then do the next tier, etc. This way each tier gets frozen as soon as it is made and the cake isn’t sitting around very long before it gets iced. Also you don’t have to re-freeze anything.
The first thing to figure out when making a tiered cake is how many people you need to serve. That will help determine the sizes of the tiers. The other consideration is the size of your oven, refrigerator and freezer space. I have a huge freezer, but my refrigerator won't accommodate anything larger than a 15-inch platter, so 12-inch is about as big as I like to go. Don’t forget that you need a sturdy base for this large a cake and it’s usually 2-4 inches larger than the cake that goes on it so that’s why I’m making the 12-inch base tier.
According to Wilton, a 12-inch tier should serve 55 people. Here’s an example of how you would cut a 12-inch tier:

This should give you an idea about how to figure out how many your tiers will serve, should you want to change the size of the tiers.
I figure that my 3 tiers should serve 90-100 people, if all of the tiers were the same. Since I’m making some white and some chocolate, there will be people who want a taste of each, so this size cake should be good for my party of 65.
In addition to the cakes, icing and filling, I’ll need cake boards for the bottom of the cakes, supports to stick into the tiers and a base board, masonite or cake drum, to support the cake once it is completely tiered. Since I’m freezing it frosted, I also like to have extra-long heavy duty aluminum foil and some kind of box to put each tier in. This year I was able to to find the perfect plastic box at one of the storage stores in town. The hard part about finding a box is that it needs to be rigid enough so that it won’t fall in on the cake and it needs to be at least 6-7 inches high.
So, to sum up, here’s the equipment you would need to make a tiered cake:
1. Cake pans in the sizes you want (12, 9 and 6 for me)
2. Cake boards for each tier (cardboard is fine) – I like to use either the same size as the cake or a little smaller
3. Supports – I use straws because they're very easy to cut, not dowels, which need to be sawn. I think I will need 8 to support the 9-inch tier and 4 –5 for the 6-inch tier
4. Masonite or drum board to support the entire cake ( see the picture above which is actually on two drum boards)
5. Heavy-duty aluminum foil
6. Boxes freezing the cakes (peferably plastic) – 14-inch x 7-inch high the larger tier, 12-inch for the 9-inch tier and 8-9-inch for the small tier
7. Either a cake saw or a long serrated knife for leveling the cakes
 This one came from http://www.wilton.com/
8. Decorating equipment – spatulas, icing bags and decorating tubes
There might be more equipment, but that’s all I can think of now. Next post, I’ll be working on the filling …
Friday, April 24, 2009
Mushroom Agnolotti with Bean and Sausage Sauce
What are these pasta recipes doing on a blog about desserts? Well, we bakers DO eat real food, too! And who can resist a contest where the prize is a set of All-Clad copper core pots. I had such good success with my first recipe using Buitoni’s new pasta products, that I was thrilled to receive my package of their new mushroom agnolotti. Thank you to Foodbuzz and Buitoni for introducing me to these wonderfully plump mushroom half-moons. In this recipe I've paired them with a melange of diced tomatoes, beans, sausage and zucchini
Serves 6
2 tablespoons olive oil, divided
1 zucchini, washed and cut into small dice (leave the skin on for lovely color)
Seasoned salt to taste
1/2 cup diced sweet onions (or more to taste)
1 cup mushrooms, washed dried and sliced into 1/8-inch pieces
6 uncooked breakfast sausages (preferably turkey)
1/3 cup dry vermouth or dry white wine
2 cans petite diced tomatoes
1 teaspoon dried basil
1/2 teaspoon dried sage
14-ounce can kidney or mixed beans, drained
1/2 cup water
3 packages of Buitoni™ Wild Mushroom Agnolotti
3/4 cup coarsely grated fresh Parmesan cheese (or to taste)
Have ready a large pot of boiling water, seasoned with 1 teaspoon of salt.
Heat 2 teaspoons of olive oil in a large skillet. Add the zucchini, season with seasoned salt, to taste, and cook until the zucchini just starts to brown. Remove and set aside.
Add another teaspoon or two of olive oil to the hot pan, add the onions and mushrooms, reduce the heat and cook until the mushrooms are lightly browned and have lost some of their water, about 5 minutes. Remove and set aside.
Add another teaspoon or two of olive oil to the pan and add the sausages. Let them brown on all sides (medium to high heat) and then remove them from the pan. Slice the sausages into 1/4-inch rounds.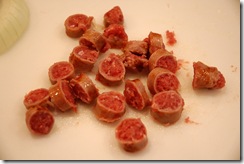
Return them to the pan and let them lightly brown, about 1 minute. If there is any excess oil in the pan, it can be blotted out, if desired.
Add the vermouth or wine to the hot pan, scraping up all of the browned bits in the pan. Cook until the vermouth is almost completely evaporated out of the pan. Reduce the heat, add back in the zucchini, onions, mushrooms and sausages. Add the tomatoes, basil, sage, beans and water. Cover and simmer for 20-25 minutes.
About 6 minutes before the sauce is ready, cook the agnolotti in the boiling water, following the package directions.
Just before serving add about 1/2 cup of the pasta water into the sauce. Spoon the agnolotti into 6 bowls. Top with sauce and fresh cheese, to taste.
Creamy Agnolotti with Roasted Asparagus, Grapes and Shrimp
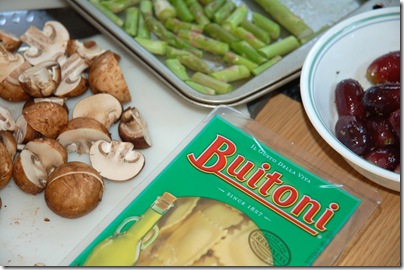
I got so excited about the Buitoni® contest, that I didn’t wait for the free sample from Buitoni, offered through Foodbuzz. I immediately went to the store to see which product I could use for dinner that evening. Here’s the result of my exuberance: A dish in which a riot of flavors leap off the plate in this colorful mix of pasta, veggies, fruit and light cream sauce.
Serves 5
2 packages Buitoni® Quatro Formaggi Agnolotti
24 thin asparagus spears, washed and tough ends cut off
2 cups red seedless grapes
1 tablespoon + 1 teaspoon olive oil
seasoned salt, to taste
1 pound cremini mushrooms, washed, dried and halved
20 medium shrimp, shelled and deveined
1/4 cup dry white wine or vermouth
2-1/2 cups fat free half-and-half
2 tablespoons unbleached flour
1/2 teaspoon thyme
6 tablespoons feta cheese or coarsely grated parmesan or a mix
Heat the oven to 400 degrees F. with a rack in the center of the oven.
Boil 4 quarts of water and a little salt in a large pasta pot.
Cut half of the asparagus spears into 1-inch pieces. Toss with the remaining asparagus in a roasting pan with 1/2 teaspoon oil and seasoned salt, to taste. Push them to one side and put the grapes on the other side of the pan, tossing them with another half teaspoon oil and salt to taste. Roast for 7-10 *minutes until the asparagus is browning and the grapes start to spit open.
While the grapes are roasting, add the ravioli to the boiling water and cook for 7 minutes.
Meanwhile, heat 2 teaspoons oil in a braiser or sauté pan, over high heat, until very hot. Add the mushrooms and saute them, adding a little seasoned salt to taste, until nicely browned, adjusting the heat if necessary. Remove them to a bowl.
Add 1 teaspoon oil to the pan, and saute the shrimp until they turn pink. Deglaze the pan with the wine and cook until almost completely evaporated.
Place half of the fat-free half and half in a shaker-jar. Spoon the flour on top, cover and shake the jar to dissolve the flour. Add to the pan along with the remaining half-and half and the thyme. Bring the mixture to a simmer. Cook for a few minutes to cook the flour and thicken the sauce. When the ravioli is done, toss it in the cream sauce. The veggies, grapes, shrimp and asparagus can be tossed with the ravioli or served on top of plated servings. Just before eating, sprinkle with the feta or parmesan.
Friday, April 17, 2009
Coconut Macaroons – Again!
This is the third post for these recipes - I don't know why the ingredients and most of the instructions were missing from the first and second post - something to do with the code for truncating the post. Hopefully, this try will work .
I'm going to repeat a lot of the information that was in the Passover Macaroon post, assuming that you might not have read that one if you aren't particularly interested in Passover.
For this portion of my series on macaroons, I tested macaroons made with sweetened condensed milk, fat-free condensed milk, Coco Lopez™, and egg whites. I also made one with sweetened condensed milk and beaten egg whites (no flour), and this one was not liked because it was too soft with no "bite". That's good news, because beating egg whites to stiff peak isn't the easiest technique and it made this simple cookie a pain to make. My taste-testers were the members of my mah jong group: Stacy Doline, Nathalie Malter, Ann Del Vecchio and Annette Telljohann, the Telljohann family and the Malter family. The clear cut winner of this batch of macaroons was the one made with condensed milk. Interestingly, those made with Coco Lopez, which were very good when made without flour, were not liked when made with flour – which is fine, because the results from them were very inconsistent anyway (the coconut oil sometimes leaked out).
The recipe most liked by tasters was given to me by Annette Telljohann. When I first researched the recipe, I found almost the exact recipe on the Internet listed as a State Fair winner, but when I went back to see if I could find out the name of the winner, I didn't find the recipe at all! In any case, I've changed the recipe a little so maybe now I can call it mine! The first change I made was to add a little more coconut to the recipe. They were plenty moist, so I knew that the cookie could take it. Why measure out the coconut, when by adding just a tad more, you can use a whole bag. Secondly, I've given instructions on how to make them "kiss-shaped", the traditional shape for macaroons. Then, I changed the baking temperature, or given some leeway in the temperature depending on what you'd like them to be like (I didn't try baking them at 375- a project for next year!). Lastly, the instructions have been fleshed out, so that you have the best possible chance for success. The second favorite is a non-dairy version and was adapted from one of my own recipes. And now, on with the recipes!
Coconut Macaroons
7-ounce bag (2-5/8 cup) sweetened coconut flakes
1/3 cup unbleached flour, measured by fluffing, scooping and leveling
Pinch salt
1 teaspoon vanilla (very important to use good quality)
2/3 cup sweetened condensed milk (fat-free was acceptable, but not preferred)
Semi - or bittersweet chocolate, chopped finely (optional)
Preheat the oven to 325 degrees F. (or 350 if you like them toastier and chewier). Place a piece of parchment paper on a baking sheet. In a bowl, combine the coconut, flour and salt. Stir the vanilla into the condensed milk. Add this to the coconut mixture and stir to combine well.
Drop the mixture by well-rounded tablespoon onto the parchment-lined cookie sheet. Using slightly damp hands shape the dough into a tear-drop or “kiss” shape.
Bake for 12-15 minutes until the macaroons tops are beginning to brown and the cookies are barely firm to the touch.
Slide the parchment onto a cooling rack and let the macaroons cool completely.
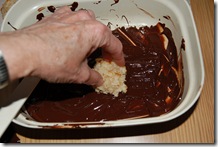
If desired, garnish the macaroons with melted chocolate (quick-tempering directions will be in another post – find it under the label "techniques"), either drizzled over them or the bottoms dipped into the chocolate (I like to set them in an egg-crate upside down until dry).
Place the macaroons in the refrigerator for 5 minutes to firm up the chocolate. After the cookies are cool and decorated, place them in a plastic bag (at room temperature) until ready to serve. You can make them 1 day ahead. You can freeze them for 3 months. Freeze them in a single layer until solid and then you can transfer them to a bag or container.
Makes 10-12 macaroons
__________________________________
Dairy-free Coconut Macaroons
Macaroons made with egg whites are a bit easier to make because they brown up better and it is easy to tell when they are done. They didn't come in first on taste tests but I think with the changes I've made, they would be neck-and-neck with the dairy macaroons. Vanilla is a critical ingredient, even more so than with the dairy ones, so use the best vanilla you can find. I use Niellsen-Massy. It's very expensive, but so worth it.
2 tablespoons + 1 teaspoon sugar
1/4 cup unbleached flour, measured by fluffing, scooping and leveling
3 large egg whites
1 teaspoon vanilla extract
1/4 cup honey
7 ounce bag (2-5/8 cups) sweetened coconut
1. PREHEAT THE OVEN TO 350°F, with an oven shelf in the middle of the oven. Line a cookie sheet with parchment paper.
2. Put the sugar and flour in a food processor bowl. Pulse-process for 10 seconds to grind the sugar a little more finely. Add the egg whites, vanilla, and honey. Process until everything is well mixed. Place the coconut in a bowl and stir in the egg mixture.
3. Drop the mixture by well-rounded tablespoon onto the parchment-lined cookie sheet. Using slightly damp hands, shape the dough into a tear-drop or “kiss” shape.
4. Bake for 12-15 minutes until the macaroons tops are beginning to brown and the cookies are barely firm to the touch. Slide the parchment onto a cooling rack. Decorate with chocolate, if desired, using the directions above.
Store as directed above
Sunday, April 12, 2009
Lower-fat Tres Leches Cake for VGABS

100% of the proceeds from the sale of these ebooks will go toward Share Our Strength's Great American Bake Sale program. Funds raised through Great American Bake Sale are donated to after-school and summer feeding programs--food programs that many kids depend on when school is not in session. Great American Bake Sale is a program of Share Our Strength, a national organization working to make sure no kid in America grows up hungry.
The Complete 2009 VGABS Recipes Ebook
Features all 170 of the submitted recipes. Many of the recipes include pictures.
On the checkout page, manually change the amount (USD) field to your donation amount.

Shopping cart courtesy of E-Junkie.
Because we know file size may be an issue for some, the below ebooks have split the 170 recipes into 4 categorized ebooks so that you can choose just 1 or 2 of your favorites, if you'd prefer. Just like for the Complete ebook, many of these recipes include pictures. And again, they are available for purchase based on any donation amount of the buyer's choosing.
Muffins & Breads
Features 24 recipes.On the checkout page, manually change the amount (USD) field to your donation amount.

Cookies, Candy, Cakes, Bars & Brownies
Features 50 recipes.
On the checkout page, manually change the amount (USD) field to your donation amount.

Desserts
Features 49 recipes.
On the checkout page, manually change the amount (USD) field to your donation amount.

Beyond Baked Goods (Appetizers, Breakfast, Main Dishes, etc.)
Features 47 recipes.On the checkout page, manually change the amount (USD) field to your donation amount.

THANK YOU FOR SUPPORTING VGABS
Friday, April 10, 2009
Chocolate Raspberry Torte

The entire collection of Amazing Passover Desserts can be downloaded now for $5.00


Sunday, April 5, 2009
Quick Tempering Chocolate
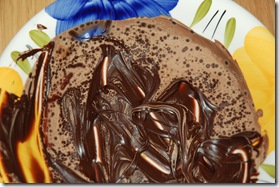
Not very pretty if this happens to your decorations.
The following method isn't 100% if you don't have a thermometer, but for little decorating jobs, where you will be using the tempered chocolate quickly ( like for decorating or dipping a dozen
macaroons) it will, hopefully, do the trick:
Start with 4 ounces of chocolate, finely chopped. Place 3 ounces in a microwave-safe bowl that won't get hot - plastic or Pyrex is a good choice.
Heat the chocolate on defrost (#3) for 1-1/2 - 2 minutes. This should be sufficient to get the chocolate melting. If it hasn't started to be liquidy, you'll need to give it a little more heat ( if you have a thermometer, you want to keep the temperature under 110 degrees F.). Add the remaining chopped chocolate and keep stirring until the chocolate is melted and smooth. (The temperature of the chocolate should have dropped down to about 85 degrees). Now, reheat the chocolate for 10 seconds on defrost (#3). This should bring the temperature to between 88 and 90 degrees F. QUICKLY, decorate or dip your baked goods..
Friday, April 3, 2009
Macaroons - The Final Story on Passover Coconut Macaroons
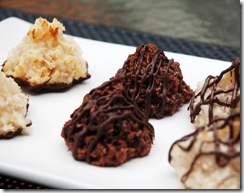
I've now made 16 batches of macaroons and have consumed 6 bites and 8 Benydryl. But I have a conclusion! Well, several actually. You'll want to discard the recipes I originally posted - the new ones are much better than the first batches. I'll post Passover recipes here, and will follow up with the flour macaroons after Passover. This way you'll be able to find the recipe you need without having to scroll through too many pages. There were basically 5 recipes that I tested: a dairy version, using sweetened condensed milk, or fat-free condensed milk, another dairy recipe using half condensed mik and half Coco Lopez and two pareve versions using egg white and honey. This time around, I decorated all of the macaroons by dipping the bottoms in melted chocolate, to ensure that it wasn't the chocolate that was skewing the previous results.
Thank you to my taste-testers, Hadassah of Charlotte, my mah jong group: Stacy Doline, Nathalie Malter, Ann Del Vecchio and Annette Telljohann and also the Telljohann family. The recipe that got top marks from everyone was the one using the Coco Lopez, HOWEVER, I made this recipe 4 times, and 2 out of the four times, the coconut oil seeped out of the cookies making for a big puddle around each cookie and causing the cookies to spread out and flatten. I suspect that either the cans are not consistent in fat/liquid ratio, or the manner in which the coconut is stirred/whisked affected the way the Coco Lopez was incorporated into the batter. I find it sad to say that you should not use this recipe, but failures are demoralizing, and I don't wish that on anyone. The ones made using half condensed milk and half Coco Lopez were the only ones that tasters hated - in fact they spit them out! And now, on to the recipes!
The recipe most liked by tasters was given to me by Annette Telljohann. When I first researched the recipe, I found almost the exact recipe on the Internet listed as a State Fair winner, but when I went back to see if I could find out the name of the winner, I didn't find the recipe at all! In any case, I've adapted it for Passover by using matzo cake meal and potato starch instead of flour. I also added 2 tablespoons more coconut so that you can use a 7-ounce bag of coconut, instead of having to measure it out. I shaped mine into large kisses - the typical shape for macaroons, and I've fleshed out the directions to ensure your success.
Kosher-style Passover Dairy Macaroons
7-ounce bag (2-5/8 cup) sweetened coconut flakes
1/4 cup matzo cake meal (DO NOT USE MATZO MEAL)
1 tablespoon potato starch
Pinch salt
1 teaspoon vanilla
2/3 cup sweetened condensed milk
Semi- or bittersweet chocolate, chopped finely
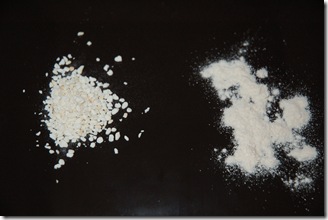
First let me show you why you should use matzo cake meal and NOT matzo meal:
The left side is the matzo meal, which is like crushed crackers, and the right side is the matzo cake meal - looking and acting more like flour.
1. Preheat the oven to 325 degrees F. (or 350 if you like them toastier and chewier. Place a piece of parchment paper on a baking sheet.
2. In a bowl, combine the coconut, matzo cake meal, potato starch and salt. Stir the vanilla into the condensed milk . Add this to the coconut mixture and stir to combine well.
3. Drop the mixture by well-rounded tablespoon onto the parchment-lined cookie sheet. Using slightly damp hands, shape the dough into a tear-drop or “kiss” shape.

4. Bake for 12-15 minutes until the macaroons tops are beginning to brown and the cookies are barely firm to the touch.
5. Slide the parchment onto a cooling rack and let the macaroons cool completely.
6. If desired, garnish the macaroons with melted chocolate(quick-tempering directions will be in a new post - Tempering Chocolate), either drizzled over them or the bottoms dipped into the chocolate (I like to set them in an egg-crate to dry).


6. Place the macaroons in the refrigerator for 5 minutes to firm up the chocolate. After the cookies are cool and decorated, place them in a plastic bag (at room temperature) until ready to serve . You can make them 1 day ahead. You can freeze them for 3 months. Freeze them on a tray first so that each one is frozen individually, and then you can put them in a bag or container in the freezer. This way you can take out however many you want to defrost and they won't all be stuck together. Makes 10-12 macaroons
Penny’s Passover Vanilla Macaroons (Pareve-non-dairy)
I adapted this recipe from my Cocoa Macaroon recipe in Amazing Passover Desserts. On the first run-through (previously posted) it was my least favorite version, but it came in second with taste-testers. After several more rounds of changing and testing, it ran neck-and-neck with the dairy version, above. In addition, I think it's easier to tell when these are done baking. They come out nicely shaped with bits of toasted coconut. You DO need vanilla, so if you don't use regular vanilla and cannot find Passover vanilla, use vanilla sugar or vanilla bean. Some packaged vanilla sugar is extra-strength, so check the package for the amount to use. 2 tablespoons + 1 teaspoon sugar
2 tablespoons matzo cake meal
2 tablespoons potato starch
3 large egg whites
1 teaspoon Passover vanilla extract
1/4 cup honey
7 ounce bag (2-5/8 cups) sweetened coconut
1. PREHEAT THE OVEN TO 350°F, with an oven shelf in the middle of the oven. Line a cookie sheet with parchment paper.
2. Put the sugar, coconut, matzo meal and potato starch in a food processor bowl. Pulse-process for 10 seconds to grind the sugar a little more finely. Add the egg whites, vanilla, and honey. Process until everything is well mixed. Place the coconut in a bowl and stir in the egg mixture.
3. Drop the mixture by well-rounded tablespoon onto the parchment-lined cookie sheet. Using slightly damp hands, shape the dough into a tear-drop or “kiss” shape.
4. Bake for 12-15 minutes until the macaroons tops are beginning to brown and the cookies are barely firm to the touch. Slide the parchment onto a cooling rack. Decorate with chocolate, if desired, using the directions above.
Fudgy Coconut Macaroons (Pareve-non-dairy)
Since doing all of the work on the vanilla macaroons, I'm wondering if the technique employed in the recipe above, might make an even better Cocoa macaroon. I think I'm done for this year, but maybe next year I'll have to try that out...
The following recipe is from my CD-rom, Amazing Passover Desserts. While experimenting with lower fat recipes, I developed this one which I think is more fudgy and delicious than my recipe originally published in Passover Desserts.
Coconut has a tendency to either fluff, or pack when it is measured in cups. Because of this, the moistness of the cookies will change every time you make them, unless the coconut is weighed and remains constant. I like these macaroons on the underdone side so that they are slightly fudgy in the middle. The timing is crucial, and you will have to experiment to see how long to cook them in your oven. Macaroons can be made with or without potato starch or matzo cake meal. Those made with neither will be moist and soft, but it will be easier to either under or over-bake them. Those with potato starch will be slightly firmer, and those with matzo cake meal will be slightly chewier, my personal preference. If you’d like to make them with sweetened coconut use the above recipe, substituting cocoa for the potato starch.
9 ounces unsweetened coconut (about 3-1/2 cups, lightly packed)(if using sweet coconut, see the recipe above using cocoa instead of potato starch)
1/4 cup Passover cocoa (Dutch-process if you can find it)
1 cup sugar
2 tablespoons matzo cake meal, or potato starch, optional
4 large egg whites, room temperature
1/2 teaspoon Passover vanilla extract or water
1/4 cup honey
1. PREHEAT THE OVEN TO 325°F, with oven shelves in the middle and lower third of the oven. Place parchment paper on 2 cookie sheets.
2. Put the coconut, cocoa, sugar, and matzo meal (if using), in a food processor bowl. Pulse-process until the coconut is finely ground, about 10 to 20 seconds. Add the egg whites, vanilla, and honey. Process until everything is well mixed, 10 to 20 seconds.
3. Use a pastry bag with an extra large star tip (6-8B) or cut a 1-inch hole in the end of a pastry bag. Onto the parchment lined sheets, pipe out mounds that are 1-1/2-inches in diameter and 1-1/2-inches high. With your fingers, shape the tip to a point to make the traditional "kiss" shaped macaroon. Alternatively the batter can be spooned onto the sheets using a tablespoon.
4. BAKE for 13-15 minutes or until the crust dulls, switching the positions of the cookie sheets after 7 minutes.
TIPS
Buy coconut and Passover extracts at: http://www.kosher.com/
Buy Passover cocoa at: http://www.aviglatt.com/
BUY MY ENTIRE COLLECTION OF AMAZING PASSOVER DESSERTS,
$5.00


